Welcome to the official Janome.com Blog Page!

  • 3/22/2021

    Welcome back to the Janome Rainbow Quilt Block of the Month designed by Janome Maker Carolina Oneta! We hope you had fun making Block One in this delightful Block of the Month! 


    This month we will make our second block, the Economy Block. The Economy Block is also known as a Square in a Square Block. The solid version is gorgeous but it is also a fun block to add a fussy cut in the center! 

    All the blocks in the Rainbow Quilt Block of the Month 2021will have a finished size of 12” finished so that means the unfinished size will be 12 1/2."

    Fabric Requirements:

     White background

    · Two 7” squares

    Light Pink (center)     

    · One 6 1/2” square

     Dark Pink

    · One  7 1/2” square


    Instructions:


    • From the 7.5″ square cut corner to corner to create (4) triangles.
    • From the two 7″ squares, cut each square on diagonal to create (4) triangles

    Center the long edge of two of the smaller triangles on opposite sides of the center square and sew using a 1/4″ seam. Triangle tips will overhang the outside edges of the square.


    I recommend that to make sure that your triangles are centered, fold the long edge in half and make a little crease with your fingernails at the center. Do the same on all four sides of the center square. Match up crease marks to easily center the triangle.

    Press seams toward the outside triangles. Trim dog-ears. Repeat the process with the remaining 2 triangles, pressing seams toward the outside.


    Repeat the same process with the final 4 triangles, sewing two sides, pressing toward the outside, sew the remaining 2 triangles, press.


    Trim your block if it is necessary to 12.5” x 12.5”


    After you finish your block, please be sure to share a photo on our social media!

    Janome Sewing Classroom on Facebook

    Instagram

    Pinterest

    Twitter

    Be sure to use the hashtags 

    #janomemakes + #rainbowquiltBOM2021 and tag @janomeamerica! 


  • 5/5/2021

    Celebrate Mom by designing and embroidering customized ribbons with your Janome embroidery machine, to compliment your gift wrapping. Let her know just how much she means to you by including a special message of your choice. 


    Janome Artisan Maday from Sustainable Textile Design has the perfect solution to add that special touch to all of your gifts for Mother’s Day and throughout the year! 


                              A picture containing text

Description automatically generated


    Supplies:

    Iris Polyester ultra brite embroidery thread – assorted colors

    Bobbin thread – white 

    RE20 embroidery hoop

    Sulky Sticky Fabri-Solvy stabilizer (water-soluble)

    Tear-away stabilizer (to float under the length of the hoop)

    Cotton ribbon 1.5” wide (your choice of color and desired length)

    Organ needle size 12 or 14

    Water-soluble marking pen (optional)

    Janome curved embroidery scissors


    Machine Used

    Janome Skyline 9


    Wrapping Paper

    Assorted Florals 


    Don’t forget mom’s presents! 


    Celebrating moms and all mother figures around the world this month is always inspiring to me. 


    I look forward to the love and unique experiences this holiday brings to my family. There are always opportunities to spoil the mother figures in our lives and we never take for granted the chance to show them just how much we care about them.


    While I pondered what project to create for this submission, I knew that I wanted it to be customizable for any occasion, quick, and most importantly, meaningful

    The ribbon that I used for this project was repurposed from another package I received in the mail. It was too good not to reuse it.


    Let’s get started!


    • Hoop the sticky Sulky wash away stabilizer


    • Position multiple lengths of ribbon using the entire hoop leaving small gaps in between each row. I made sure to twist the ribbon so that the text would appear right side when the ribbon was folded during gift wrapping. 


    HINT: Practice wrapping the gift so that you have an idea of how the text will lay once embroidered. You can use water-soluble pens to mark where you want the monogramming to appear exactly when you hoop it. 


    A picture containing indoor

Description automatically generated


    • You are ready to customize your ribbon message (s). Going to the home icon on the upper right-hand side, select ABC.


    • Choose the text box that appears vertically (AB highlighted below) so that it runs the length of the ribbon. For letter-size, I chose Small and Medium and most of the time, lower case letters. If something does not look correct, you can use the “trash can” icon under “OK” to delete and start over. 

    A picture containing text, indoor, cellphone

Description automatically generatedA close-up of a credit card

Description automatically generated with low confidence


    • As you type your desire phrases you can rotate, curve or space out each individual line of text within the edit screen to further customize your message. 

    A rectangular electronic device

Description automatically generated with low confidenceA picture containing text, electronics, cellphone

Description automatically generated


    • Use arrows on the edit screen to move the text up/down or side to side to help you center the messages. 

     Once you are satisfied with the placement, you are ready to embroider!


    A picture containing text

Description automatically generated


    HINT: Keep in mind that the ribbon will wrap around the objects, so moving the text to appear differently on the ribbon (i.e-top, middle, lower part), helps to see it more clearly. The same applies to the size of the font and thread color used (please see photo below).


    A picture containing text, indoor

Description automatically generated


    • Carefully remove the ribbon from the sticky stabilizer and trim it back. You can dampen the ribbon if you like to remove the stabilizer but without testing it first for color run, I prefer to trim it instead. 

    A picture containing indoor, paper, cloth

Description automatically generated


    Helpful Hints: 

    Use your hoop grid template to assist you in aligning the text of your choice within the width of the ribbon.

    Untread your machine needle and hit the “start” button (when you are ready to start) to ensure that the text will appear in the desired spot before you start embroidering, that way you don’t have to remove stitches if it does not align correctly and ribbon or thread won’t be wasted. 

    Always “float” a piece of tear-away under the fabri-solvy stabilizer when embroidering on ribbon or delicate fabrics to prevent puckering. Start with a new needle. 

    Measure the boxes you will use to ensure that you have enough ribbon and that your text will appear where it will be readable.


    Now comes the fun part! Gift wrapping Mom’s gifts!


    A picture containing text

Description automatically generated


    I hope this quick project inspires you to use and experiment with embroidering on ribbons to create customizable gift-wrapping accessories that are sure to delight makers and recipients alike. Testing on a small piece of ribbon will inform how best to stabilize the ribbon before making yards of it.  Have fun and happy gift-giving for all occasions!


    Maday.

     www.sustainabletextiledesign.com

  • 5/11/2021

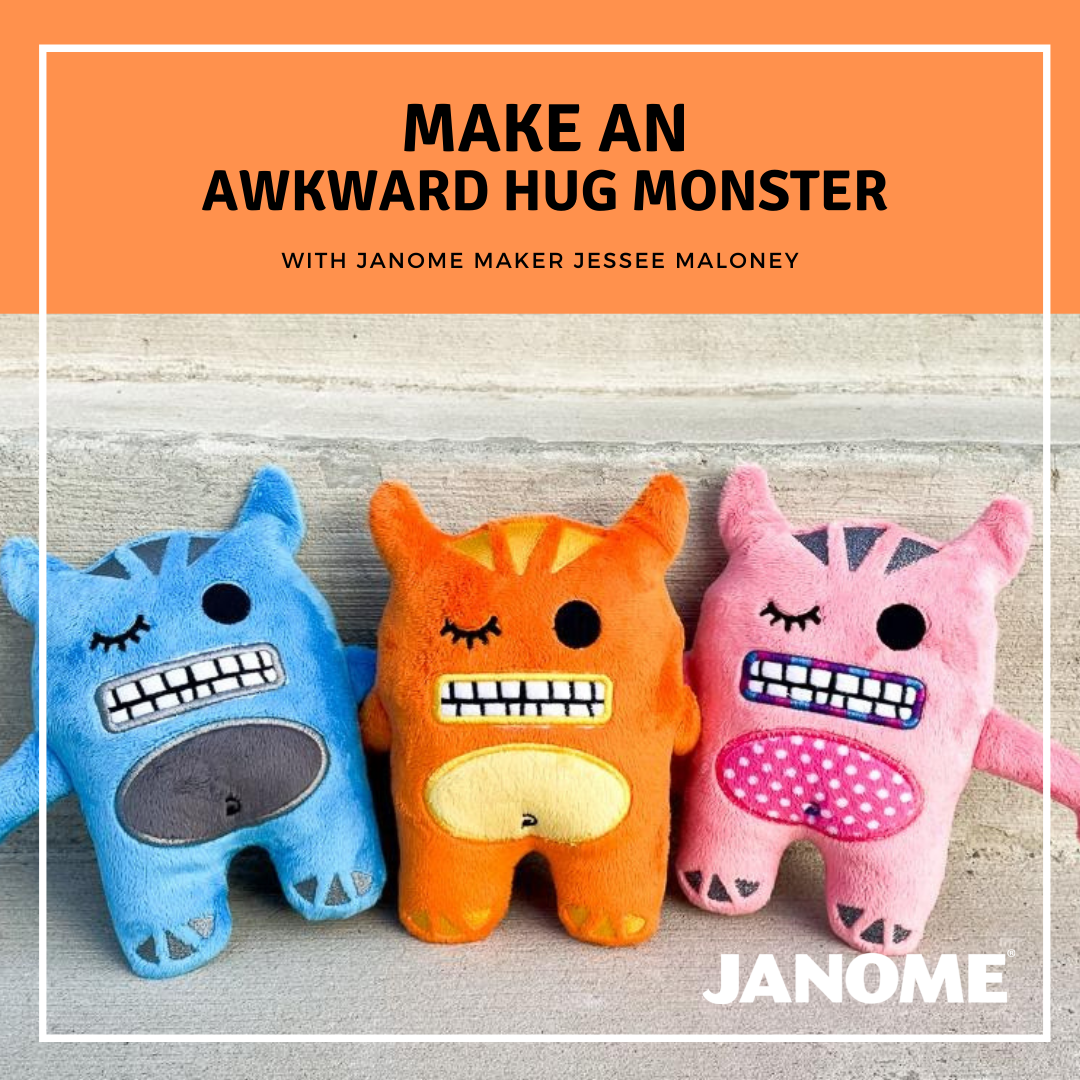
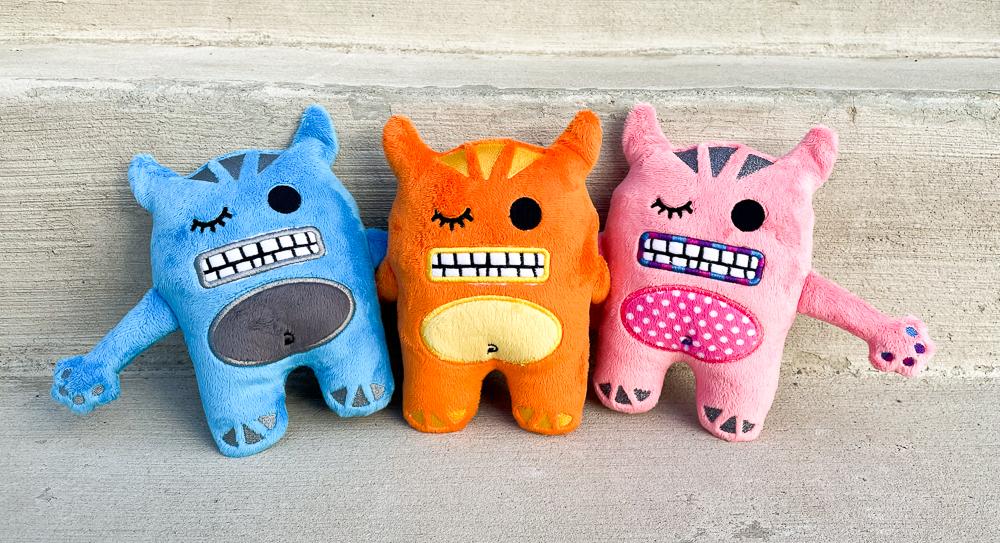
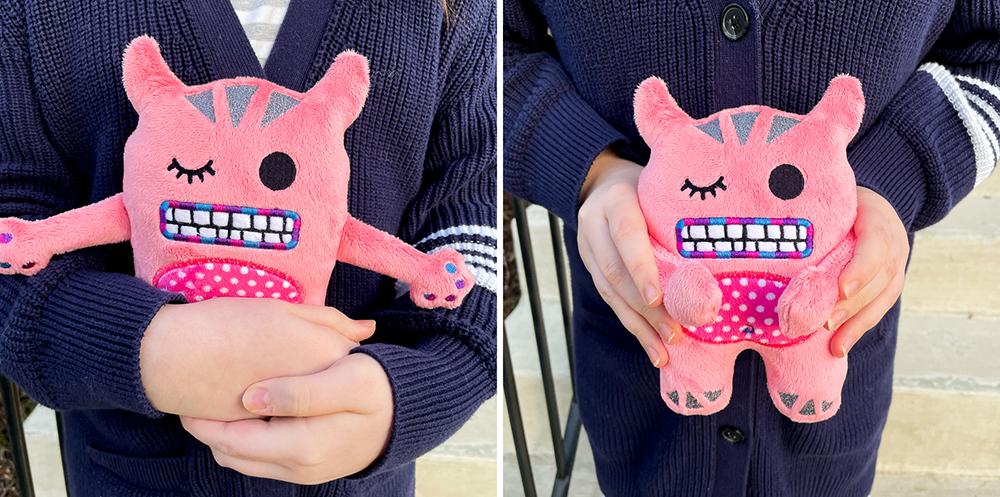
    We can always depend on our Janome Makers to come up with fantastic projects to make for ourselves and for others! Jessee created the most adorable little monster! You can make one or an entire rainbow of cuddly friends to brighten your day! You will learn how to sew with minky, how to create their sweet quirky faces using in the hoop embroidery, and best of all, bring joy to all the people you will be making them for in your life! 


    Hello! Jessee here from Art School Dropout with another super cute embroidery project! 

    This time around though we’re making something that is perfect for these trying times and a great gift to send to a loved one. Hint: It fits perfectly in a Priority Mail envelope!

    I'm calling them the Awkward Hug Monsters. They are fluffy monsters with the most awkward smile you ever saw and short floppy arms that are just waiting to hug you. 

    The best part about this project however is that most of it is done IN THE HOOP! (Just pretend I'm saying that in an announcer’s voice). I'm serious though, the only part not done in the hoop is making the arms floppy, stuffing it, and sewing the hole shut. I love projects like this.

    We have a bit to cover though, so let's get started...

    Recommended Supplies:

    • An embroidery machine with at least a 230x300mm hoop (I used the Janome MC15000)

    • 1/3rd yard of plush fabric for the body. (I used Shannon Fabrics Cuddle 3 for all of my examples, but other minky and fleece would work well too)

    • 1/8th yard of plush fabric for the belly

    • Small piece of white fleece or felt for the teeth (or any color you want)

    • Polyfil Stuffing

    • Embroidery thread in Black for the eyes

    • Embroidery thread in a coordinating color for the stomach, lips, toes, etc.

    • Thread that matches body fabric for stitching the arms and body shut

    • Scissors

    • Tear-away stabilizer

    • Temporary spray adhesive (I used Odif 505)

    • Water-soluble stabilizer

    • Embroidery File 
    • Optional Supplies:


    • Duckbill applique scissors

    • Rotary cutter

    • Cutting mat

    Now that we've rounded up all of our supplies, let's get started. 

    First things first, we need to get comfortable with the materials we are using. Plush fabric isn't like wovens or knits. It has a nap, and if sewn in the wrong direction it just doesn't look right. So what I do is I figure out how I want the plush to lay by brushing it back and forth until it looks like this...


    This shows me which direction the nap goes. I want it so the plush basically goes down like a waterfall. I keep this in mind when cutting and when adding it to my hoop.


    Once we have a handle on the nap, you will need two pieces of the main body color cut at 10x12.5 and one belly piece cut at 2.5”x4”. As shown below.


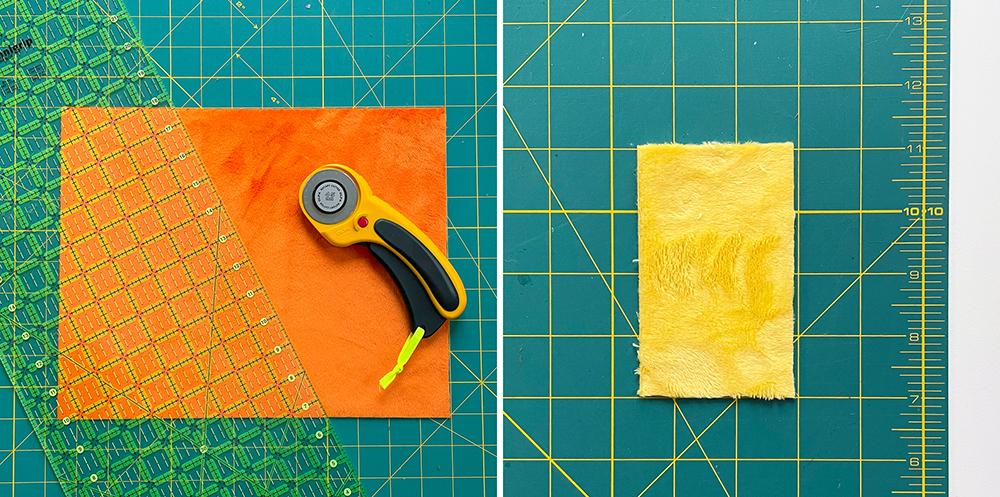
    You'll notice a bunch of tiny plush dust on the edges, which is totally fine! Just shake the piece out a bunch and vacuum it all up later. It won't hurt you.


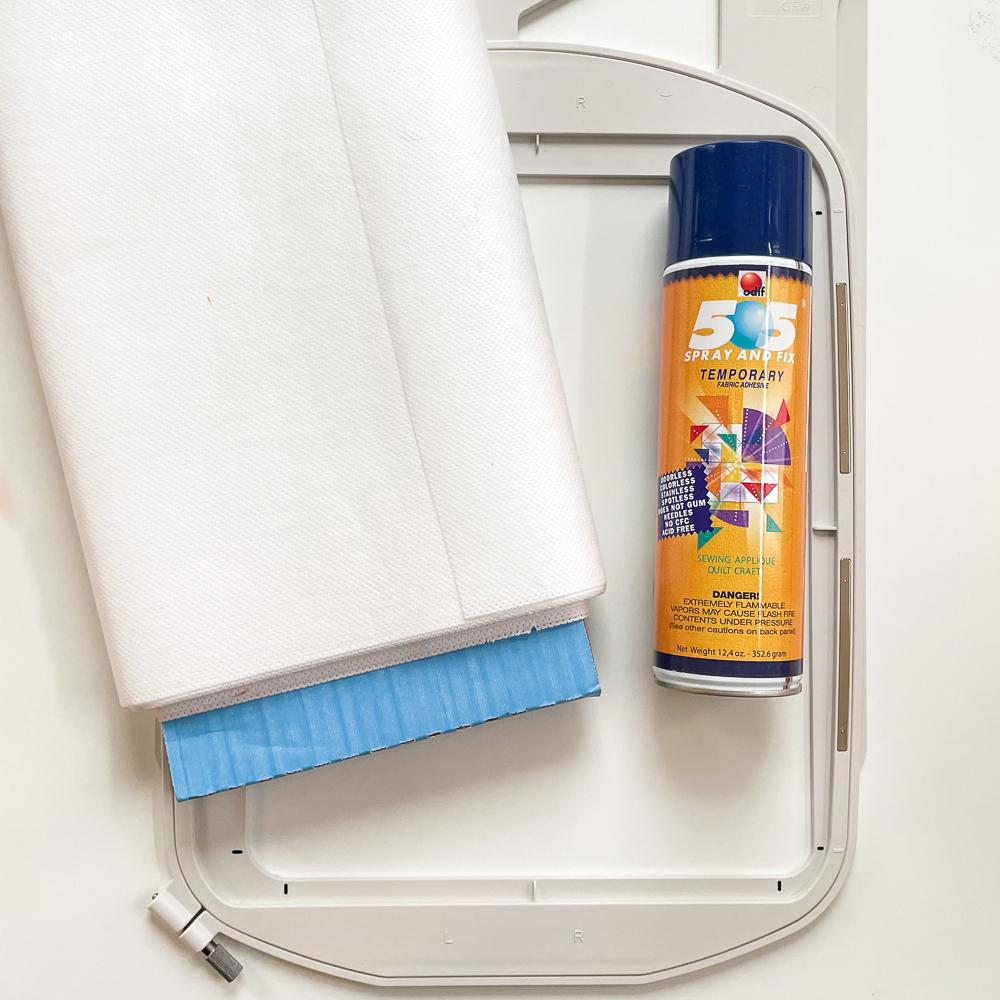
    Now it's time to prep the hoop! Normally I'd use a sticking-backed stabilizer, but since I'm using a larger hoop, and I wanted to keep the cost down, I opted for some medium-weight tear-away stabilizer instead. Just cut it about an inch larger than your hoop and place it inside, without any fabric, the way you normally would.

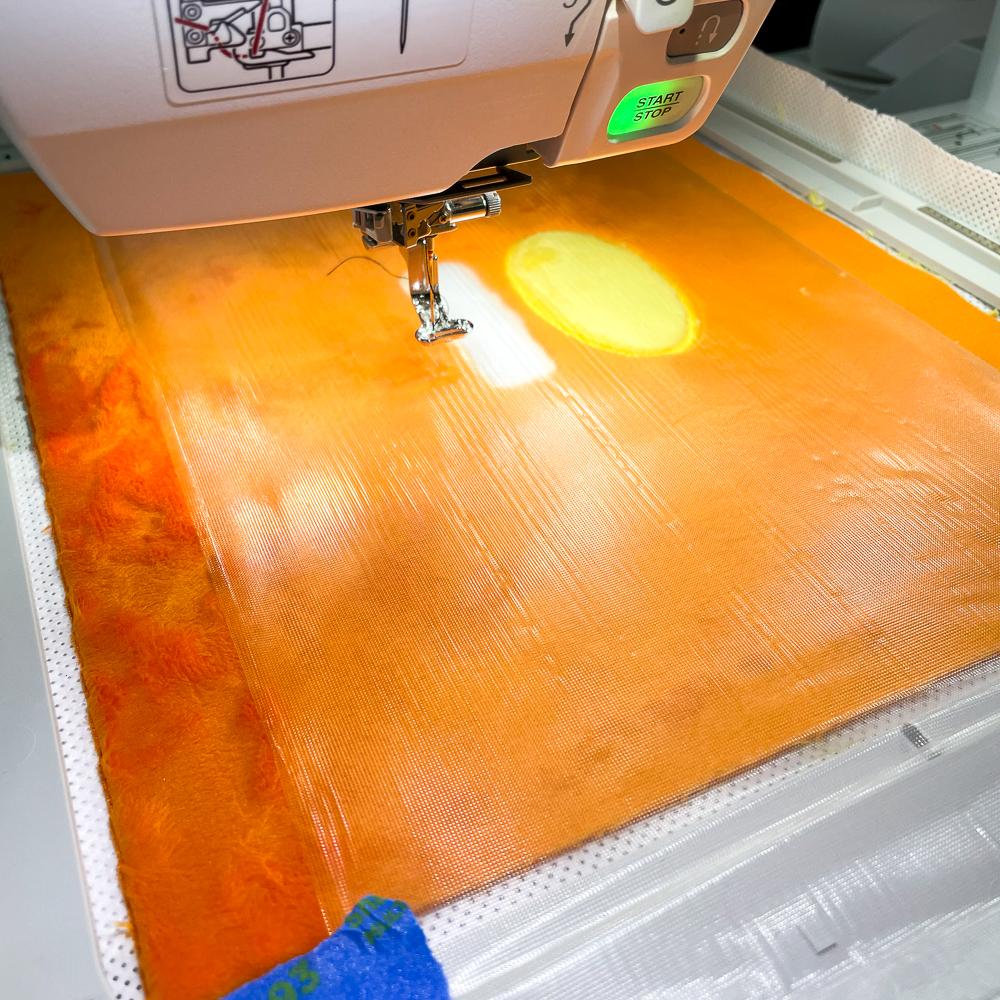
    Then spray the backside of one piece of plush, while still keeping an eye on which way the nap goes, and place it centered in the hoop. For the MC15000 and the GR Hoop, I had my nap pointed towards the right to go along with the embroidery file. 


    From here you will load up your machine with the Awkward Hugs Monster embroidery file, thread it up with the first color and hook up your hoop!


    Special Note: Please make sure that your Stitch Stop is on for this project! We need all that extra trim time to make this as professional-looking as possible.


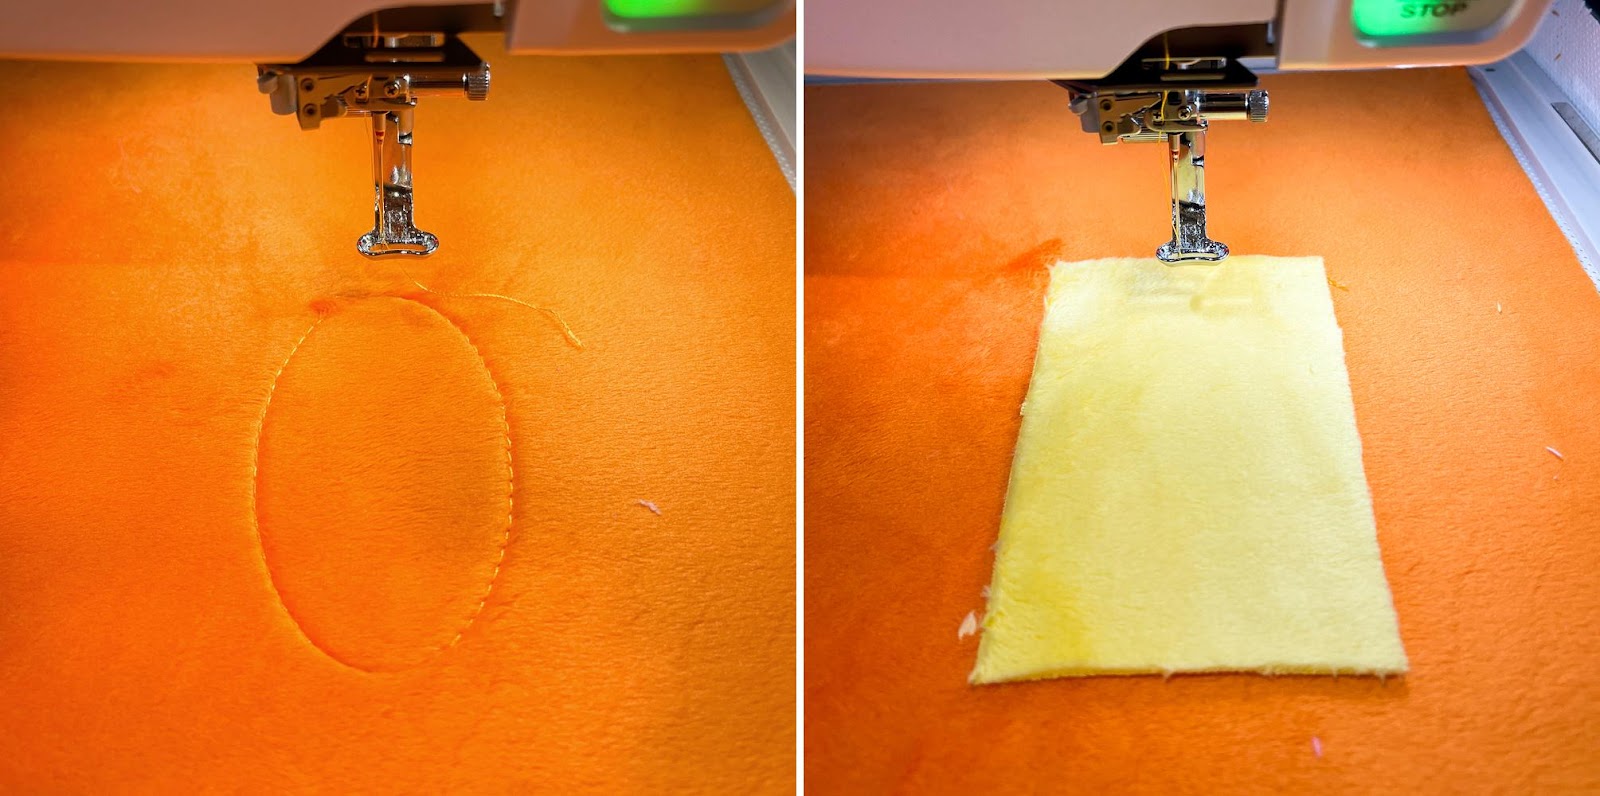
    So the first set of stitches will be the outline of the belly. This file is set up to just place a piece of fabric on top of this stitch outline, let it do another outline, and then trim before it does an applique stitch all around. 


    As you can see from the above photos, I haven't added any Water Soluble Stabilizer on top yet. I know this is a big NO-NO for plush fabric, but I promise you I have my reasons!


    So after the belly is stitched on, you'll want to add the teeth. This is a multi-step process that will go back and forth, so don't worry that you have colored zig-zag stitches all over your pretty new fleece teeth.


    Side Note: I do not recommend using plush fabric for the teeth. I tried this in the first prototype and my daughter said it made it look like it had multiple rows of teeth and really “creeped her out”. Oops.


    Once your teeth have been tacked down, now is the time to add the sheet of Water Soluble Stabilizer on top. I waited until now because of all the applique going on! If you had added it from the start, we would have several layers of the stuff by now. See where I'm going with this? Also, if you are new to plush fabric, you may be wondering why we use this stuff. Well. It's mostly to keep the nap of the plush down so it doesn't get caught up in the embroidery designs and looks weird. It gives everything a nice clean look in the end! Well worth the extra step and cost.


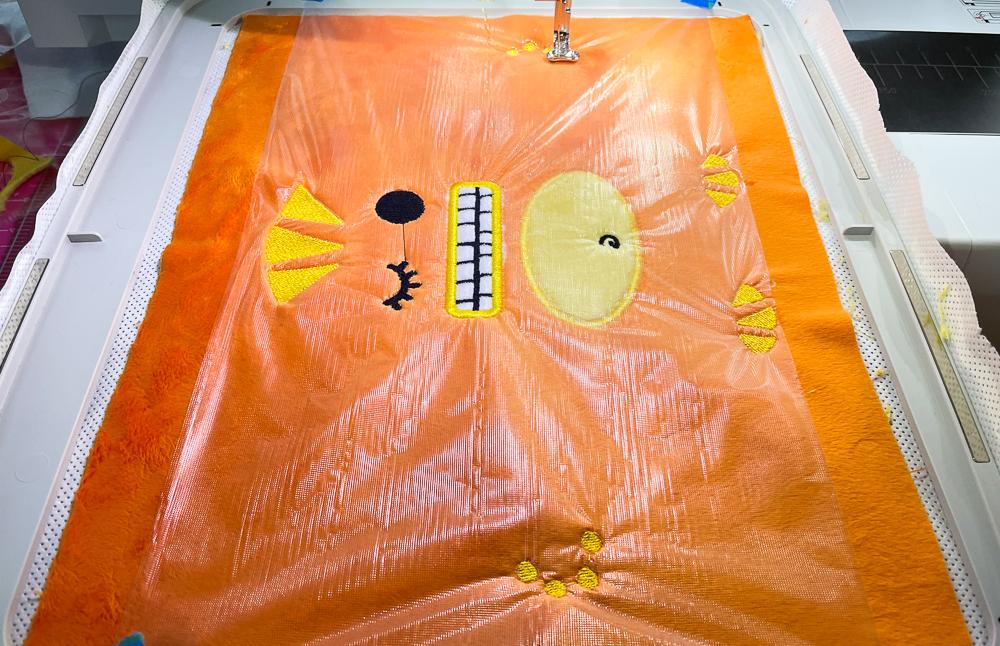
    From here just follow the thread colors in the embroidery file and everything should look like it does above. Yes, you will be switching back to that first color after the black thread, but it was really the only way to get that beautiful monster smile to shine.


    When you get to this point, you can go ahead and tear off the Water Soluble Stabilizer. I know it's meant to be soaked off, but the embroidered parts are so dense, it just tears off. Way easier. However, keep the design in the hoop still since there is one more IN THE HOOP step.


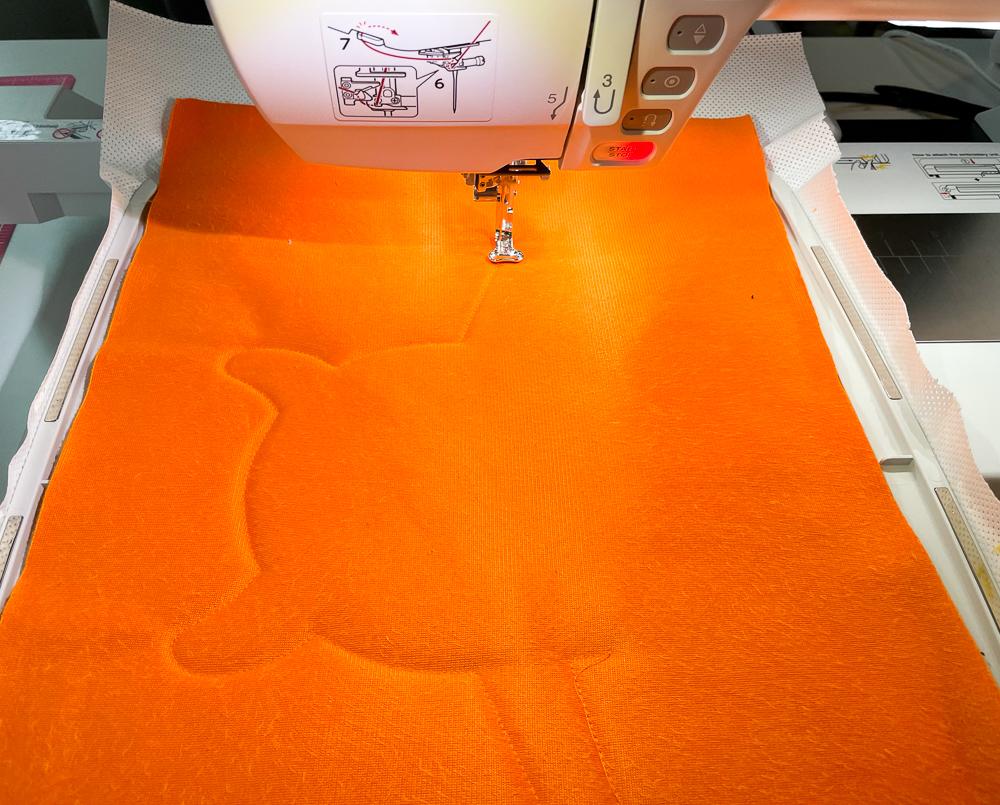
    While still keeping an eye on which way the nap is going, place the second piece of plush fabric we cut earlier down on top of your newly embroidered monster parts. Make sure it’s plush side down too. 


    You could tape it in place, but I noticed it hardly shifts at all and I just keep an eye on it while the machine does the last outline stitches.


    Once it has finished its laps around the body, you are ready to take the hoop off the machine and remove your inside-out monster! We are so close to being done!!!


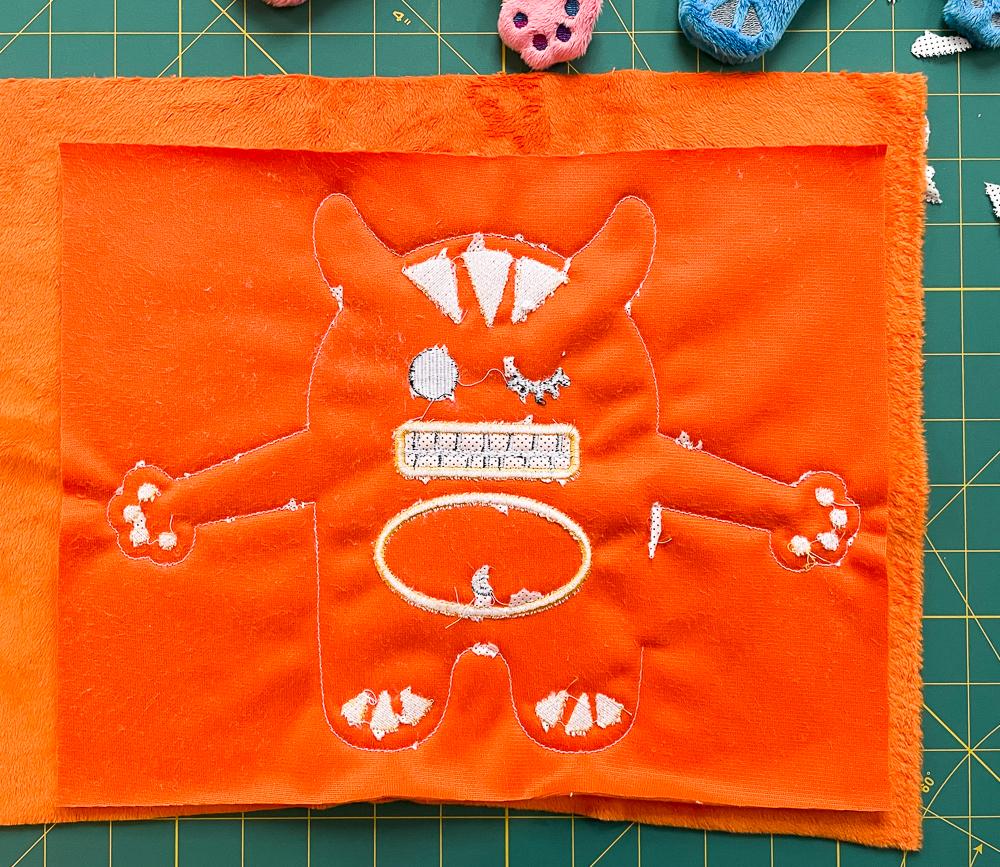
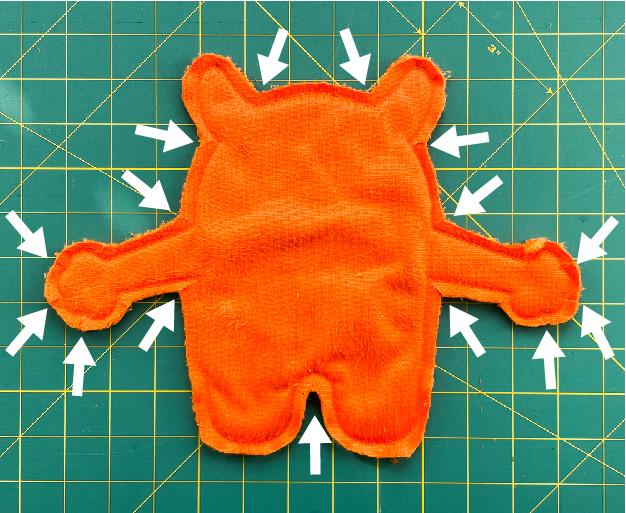
    Next, you will need to cut them out, leaving at least a 1/4” seam allowance, though I'd much rather it be 3/8”. Your choice if you want to live on the wild side. While trimming, you'll need to cut slits anywhere there is an indent in the design. I included photos with loads of arrows to show the best spots.


    Now your monster is ready to be turned right side out! I found that turning the horns and arms first made it easier all around.


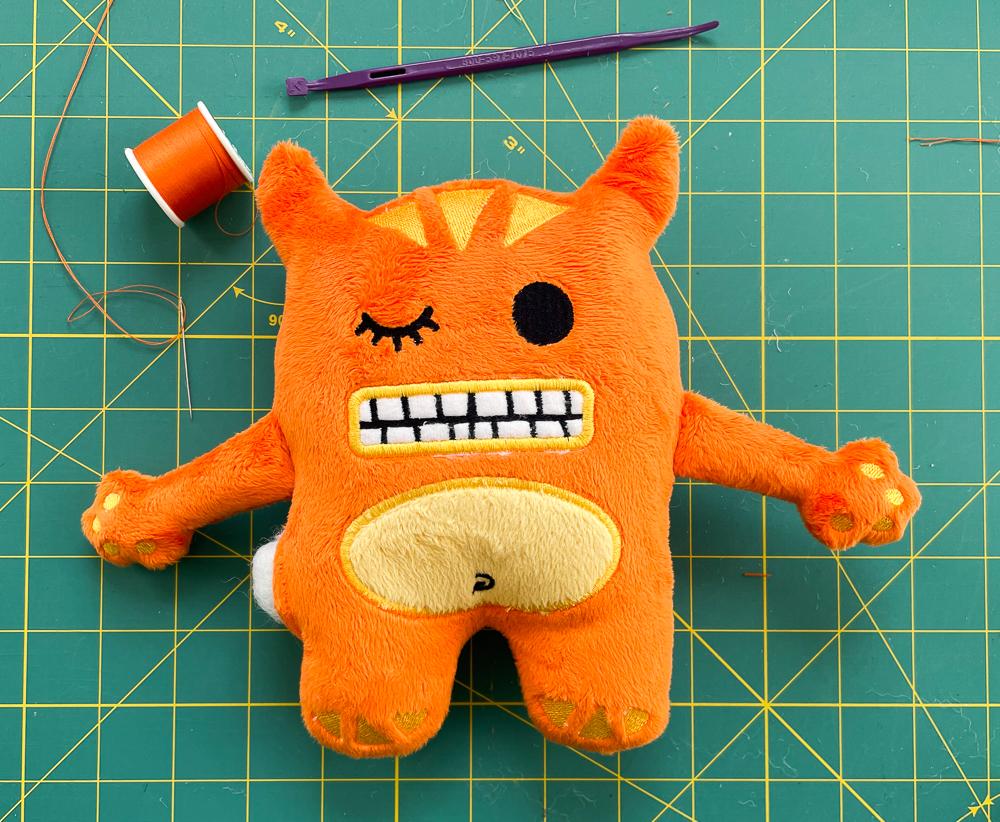
    Look at that beautiful smile!


    Remember, this monster is called the Awkward HUGS Monster, so we need to make sure these arms are ready for hugging!


    To do so, just stuff each of the arms as much as you can. The using thread that matches the body, do a straight stitch through the arm, from the armpit to the shoulder, and then back down again. Locking the thread at the end. This allows for the arm to keep all its stuffing, and it adds a hinge! Repeat this for the other arm too.


    Side note: I absolutely love “The Purple Thang” tool for stuffing plush figures. The square piece on the back grabs the Polyfil stuffing perfectly and moves it exactly where it needs to go!


    After you perform the arm hinge surgery, you will want to stuff the entire thing as much as possible. You will be using way more Polyfil than you ever thought you would. It's crazy, but I promise it will help you get the best-looking monster in the end. 


    Once your monster is nice and plump, you will want to stitch the open hole closed using a ladder stitch. If you don't know what that is, I highly recommend looking up videos. It is the best stitch ever for closing up plush toys and for adding darts when needed.


    Technically at this point, you are finished...


    BUT, I suggest one more thing! Place your monster flat on a hard surface with your palm on its stomach. Now move your hand around clockwise like you're kneading bread, and then do it again counterclockwise. This helps distribute the Polyfil a bit more and gets you a less clumpy monster. No one wants a clumpy monster!!!!


    Ok, NOW you're done!! Woohoo!! Congrats! 


    If you are anything like me though, you may keep adding to your monster family! Each time trying out different threads and color combos. This is completely normal and encouraged. So please try out that weird holographic thread you bought 6 years ago but never tried, or that variegated pink and purple thread that just collects dust! You never know what the outcome will be and this is the perfect project to test it out.


    P.S.: If you do make your own Awkward Hugs Monster, please share it with us or hashtag it #janomeawkwardhugsmonster !! We would absolutely love to see them.


    After you finish making your sweet monster, please be sure to snap a photo and share! 


    We don’t want to miss out so be sure to tag:

    @janomeamerica

    @jessee_artschooldropout


    And hashtag:

    #janome

    #janomemakes

  • 5/17/2021

    Welcome Back to the Janome Rainbow Quilt Block of the Month designed by Janome Maker Carolina Oneto!

    This month we will make our fourth block. The Dutchman's Puzzle is a classic design that first appeared in the late 1800s. Return of the Swallows or Dutchman's Wheel are two names for this block. About 1895, the term Dutchman's Puzzle was first used by the Ladies Art Company, a mail-order quilt pattern company. The pattern, titled Wheel, was first published in the Ohio Farmer in 1894.


    The Dutchman's Puzzle Quilt Block is so much fun to make! It's a basic block made up of pairs of Flying Geese blocks at its heart.

    A larger triangle (the goose) is surrounded by two smaller triangles in this surprisingly simple block. Typically, these blocks are designed to be twice as wide as they are tall.

    It's critical to choose fabrics with sufficient light-dark contrast.

    Remember that all the blocks will have a finished size of 12” so that means the unfinished size will be 12 1/2

    Fabrics:


    White background

    · Two 8” square

    Light blue

    . One 8” square

    Dark blue

    · One  8” square


    INSTRUCTIONS:


    Make Half Square Triangles (HST) 8-at-a-Time

    • Place (1) White and (1) blue square with right sides together (you will work with two pairs)
    • Draw a line diagonally corner to corner.
    • Sew a line 1/4” apart from the drawn line, in both sides.


    • Cut the square units in both directions and then diagonally, corner to corner.


    Press the seams and trim the block down to 3.5 inches square.


    • Arrange your HSTs in the correct layout
    • Using a quarter-inch seam allowance, sew together in rows. Join all rows, using a quarter-inch seam allowance.
    • Press your completed block and trim it down to 12.5″ square (if necessary).


    And that’s all! How easy was that block? Sew simple!!!!


     I hope you enjoy this new block! And don’t forget to share it!


    After you finish your block, please be sure to share a photo on your social media! We love to see what you are creating! 

    Janome Sewing Classroom on Facebook

    Instagram

    Pinterest

    Twitter

    Be sure to use the hashtags:

    #janomemakes + #rainbowquiltBOM2021 also, tag @janomeamerica and @carolina_oneto!


  • 5/28/2021


    I am always on the lookout for ways to add personality to my quilts, and my current favorite way is with an improv pieced border.

    If you are not tech-savvy (like me) and you like to play with scale and design in a way that feels doable, this tutorial might be what you are looking for.


    I absolutely love the look of a slightly wonky triangle border but you could be more precise with your version.


    For this particular sample, I will be working with a finished block. If you are planning to use this technique, I think it’s helpful to work with blocks as your paper pieced length. It helps keep things straight and lined up nicely, especially if you are using this technique with a very large quilt


    My block size is 10 x 10” so I will be using a piece of freezer paper ( you could use printer paper or tracing paper) and drawing a rectangle measuring the block length x the height that I like. For this, I want my finished block height to be 2 ½” so I will be drawing my rectangle to measure 10 x 3”


    Once you have drawn the rectangle, measure down ¼” from the inside of the rectangle and draw another rectangle. The inner rectangle will be the area of the paper piecing.

    I like to find the center of the rectangle and make a little mark.


    Draw your triangles within the inner rectangle making sure that the points meet at the inner rectangle line. They can be any width but do need to meet up at a sharp point.

    Starting at one end, number the triangles like in the photo. This is the order in which you will be piecing.

    Roughly cut around this pattern piece, I like to cut ¼ - 1/2 “ away from the outer (cutting) line


    If you want all of the pieced panels to be different, now would be the time to draw them all out. If you will be making a large border, you could simply take this and make photocopies.


    I like to cut all of my fabric pieces in advance, always 1 “ longer and wider than each numbered segment. I find this helpful, especially when you are paper piecing angled sections.

    On my pattern piece, number 1 is green and number 2 is print. With the green on top of the print, I lay the pattern piece with the line between 1 and 2 running a bit more that 1/4”over onto the side of 2.

    You could put a dab of glue here to secure the fabric but since this is so small, I will just carefully hold it all together and take it to the machine.


    On my Janome Continental M7, I set my stitch length to 1.3 and sew down the line between 1 and 2, sewing a teensy bit past the inner rectangle line.

    Using a piece of cardboard or in my case my folding friend, fold the paper back on the stitch line and trim the seam to ¼”


    Open out your pieces and give them a good press.

    Next, with the paper pattern facing up, fold back the line between 2 and 3.

    Trim the excess fabric to ¼”

    Add the next piece of fabric, lining up the straight edges and carefully flip it over and sew along the line.

    Continue this way until you have sewn all of the pieces.

    Trim down the pattern piece to the outer line.

    Continue this until you have made the desired amount of border sections.

    I love this method! As a slap dash, fly by the seat of my pants quilter, paper piecing gives me the ability to still do things in my wonky improve way but with a precision that I love!

Prev 1 2 3 4 5 6 Next 

Tags

#freesewingtutorial 4th of July Applique Block of the Month Bunny Carolina Oneto Christmas Continental M7 Cosplay Cosplay Tutorial Costume Crafting Decorative Stitches DIY DIY Accessories DIY Father's Day Gift DIY skirt Embroidery Everyday Applique Father's Day Fiesta Weave Lunch Mats Fiesta! Four Fabric Quilted Project Bag Free Bag Pattern Free Pattern Free Quilt Pattern Free Sewing Free Sewing Pattern Free Sewing Tutorial free skirt tutorial Free tutorial Fun Projects Garment Sewing Good Tidings Quilt Along Green Goddess Dress Handmade Gifts Heidi Proffety Historical Costume Tutorial Holiday Sewing Home Decor How To How to Machine Bind How to Make a Quilt How to Make a Quilt. Free Quilt Pattern How to Make Panties How to Quilt How to Sew How to sew a top Janome Janome 9450 Janome AirThread2000D Janome Artisan Janome Artistic Digitizer Janome Conitential M7 Janome Continental M7 Janome HD3000 Janome Maker Janome MamoryCraft 15000 Janome MemoryCraft 15000 Janome MemoryCraft 6700p Janome S9 Janome Sewing Machine Janome Skyline S7 Janome Skyline S9 JanomeHD9 Lifestyle Machine Embroidery Maureen Cracknell MDW Melanie Call Memory Craft 15000 Moon Garden QAYG Quilt Block Mother's Day gift Napkins Patriotic Pattern Pillow Pillows Project QAYG Quilt Block Quilt Quilt As You Go Quilt Block Quilt Block Pattern Quilted Project Bag Quilting Quilting How to Quilt Rainbow Block of the Month Rainbow Quilt Block of the Month Rainbow Quilt BOM Reversible Zippered Pillow Rolled Hem Foot Scrappy Star Pillow Sew Sewing Sewing Machine Sewing Project Sewing Tutorial Skyline S9 SkylineS9 Stuffie Summer Sewing Project The Hype Tutorial Valentine's Day
DEALERS
The TWO Closest Dealers to you are:
196 Boston Post Road , Orange CT, 06477
203-878-1654
19 PUTNAM AVENUE , PORT CHESTER NY, 10573
914-934-2934
Find Additional Dealers